Week 08 - Property Based Testing
Note
This is a written version of Lecture #8.
In this lecture we cover another state machine example, automatic testing using emulator traces, optics, and property-based testing.
This week we were using Plutus commit ae35c4b8fe66dd626679bd2951bd72190e09a123, the same commit as we used in the last lecture.
Token Sale
In the last lecture we looked at state machines, and saw how they often allow us to write much less code to express the logic of a smart contract, partly because there is a lot of sharing between on-chain and off-chain code and partly because a lot of boilerplate is encapsulated in the state machine machinery.
In this lecture we will see another example using a state machine, because the concept is very important. We will also take a look at testing. First we will look at the code, then we will explore various ways to go about testing.
The example we will use is a contract that allows somebody to sell tokens. The idea is that someone call lock some tokens in a contract, set a price, and then other people can buy them.
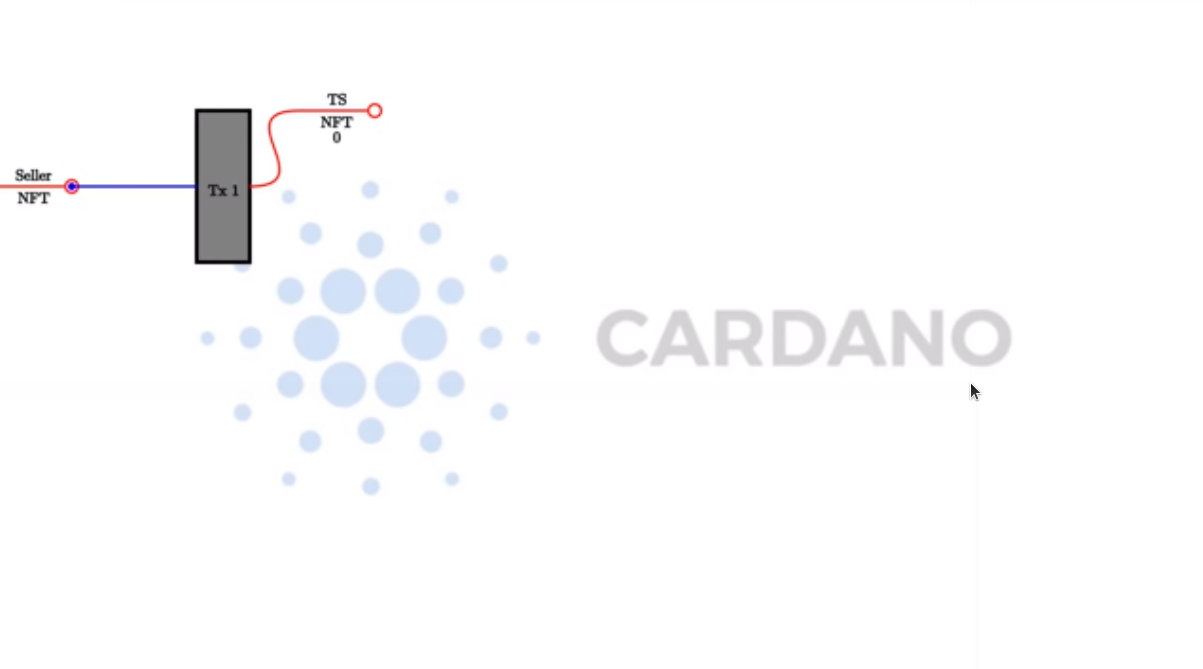
To begin, the seller starts with an NFT. It can be an arbitrary NFT and it will just be used, as before, to identify the correct UTxO that contains the contract state.
The first step is to lock the NFT at the script address of the smart contract that we are about to write. We’ll call that contract TS for Token Sale. As a datum, we will use a simple integer, which will represent the price of the token we are selling, and this will start off as zero.
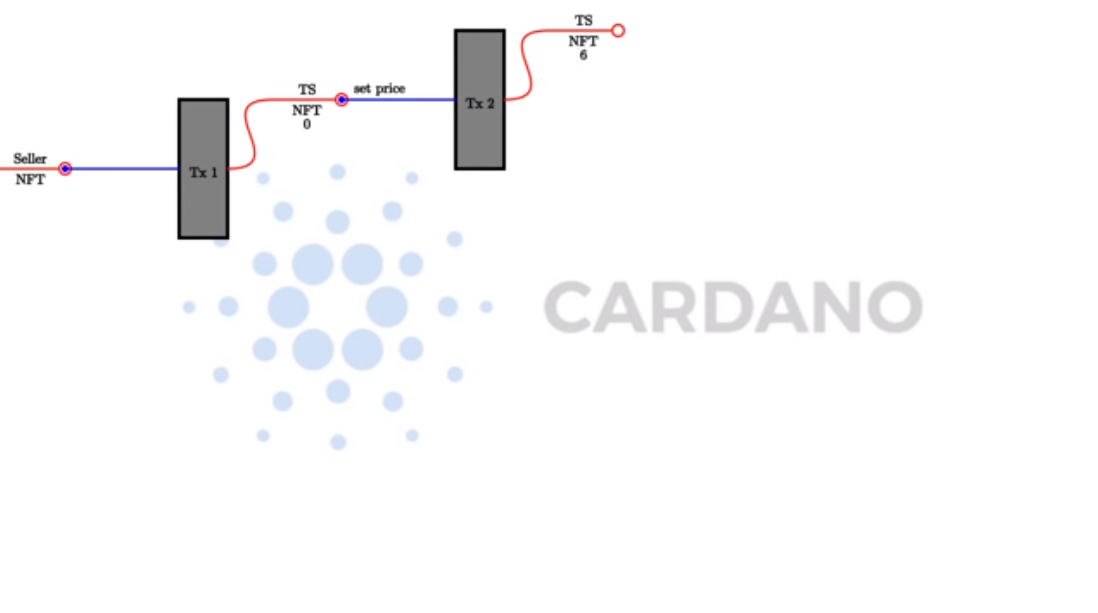
There will be several operations that the seller can do. One of those will be setting the price to a different value. In order to do that the seller will submit a transaction which has the current UTxO as input and the updated UTxO as output, where the datum has been changed to a different price per token.
Another thing that the seller can do is to lock some tokens in the contract. In order to do that they have to create another transaction which has as input the UTxO of the contract and a UTxO containing some tokens and, as output, the updated UTxO at the contract address which now contains the provided tokens.
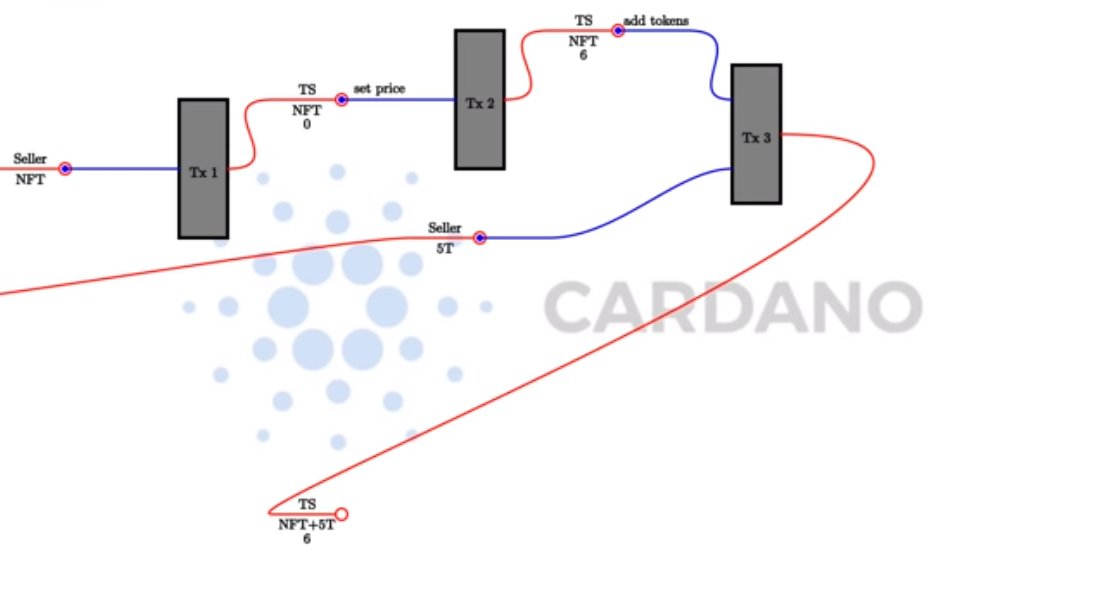
In this example, the seller provides five tokens to the contract.
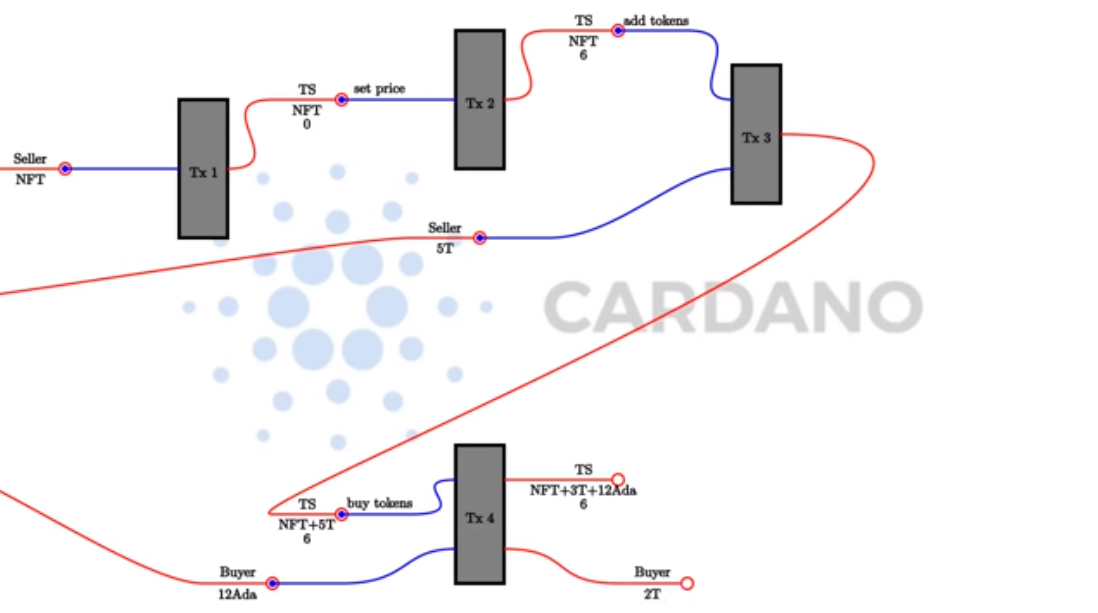
In order to buy tokens, there needs to be a transaction created by the buyer. This transaction has as input the UTxO sitting at the TS script address, and the buying price in Ada.
So, if a buyer wants to buy two tokens, they will create a transaction that has, as input, 12 Ada, and the UTxO at the script address. Then, two outputs. One the updated contract state where now the tokens are taken out and the Ada has been added, and one output going to the buyer with the tokens that they have just bought.
Finally, there must be a way for the seller to retrieve tokens and Ada. In this example if, after the sale, the seller wants to retrieve all the Ada and one token, they would create a transaction that, again, has the script UTxO as input, and, as output, the updated script UTxO with the reduced balances, and one to themselves with the retrieved funds.
The diagram just shows one scenario, but these operations can be performed in any order - tokens can be added, the price can be changed, tokens can be bought, and so on, in an arbitrary order.
On-chain code
This week’s first example is implemented in
module Week08.TokenSale
Let’s first look at the type that we will use as the parameter that we will use for the contract.
data TokenSale = TokenSale
    { tsSeller :: !PubKeyHash
    , tsToken  :: !AssetClass
    , tsNFT    :: !AssetClass
    } deriving (Show, Generic, FromJSON, ToJSON, Prelude.Eq, Prelude.Ord)
This has three fields - the seller’s public key has, the token being sold, and the NFT used to identify the UTxO.
For the redeemer, we provide exactly the operations we saw in the diagram
data TSRedeemer =
      SetPrice Integer         -- the price
    | AddTokens Integer        -- the number of tokens to add
    | BuyTokens Integer        -- the number of tokens to buy
    | Withdraw Integer Integer -- first argument is the number of tokens, the second is the number of lovelace
    deriving (Show, Prelude.Eq)
Again we have the helper function that we have used in previous examples
lovelaces :: Value -> Integer
lovelaces = Ada.getLovelace . Ada.fromValue
Now, we get to the transition function of the state machine. We see the TokenSale parameter which holds the state machines configuration values, the State object with an Integer value to represent the price of the token, then the redeemer TsRedeemer. Again, we return a Maybe, which will be Nothing if the corresponding transition is illegal, or, if it is legal, a Just containing constraints and the new state.
transition :: TokenSale -> State Integer -> TSRedeemer -> Maybe (TxConstraints Void Void, State Integer)
transition ts s r = case (stateValue s, stateData s, r) of
If the SetPrice redeemer is provided, then we only consider it to be legal if the price is not negative. We then return a Just with the constraint that the transaction must be signed by the token seller, and with the new state. The new state will be the new price p, and the Value in the contract remains the same, except for one thing.
It is a little unfortunate, but there is a discrepancy between the v on the left and the v on the right. On the left it does not contain the NFT, but on the right it does not. So, even though we want to say that we don’t want the value changed, in fact we have to remove the NFT, because the Plutus libraries will add it again. This is perhaps not an ideal design, but that is how it currently is.
(v, _, SetPrice p) | p >= 0 -> Just ( Constraints.mustBeSignedBy (tsSeller ts)
                                    , State p $
                                      v <>
                                      nft (negate 1)
                                    )
We use a helper function to reference the NFT.
nft :: Integer -> Value
nft = assetClassValue (tsNFT ts)
When adding tokens, we could check that the seller has signed the transaction, but this contract would be provided by the seller, and the seller doesn’t mind if someone wants to give them a free gift! Therefore, once we have the AddTokens redeemer and n is greater than zero, we are happy to return the new state without constraints.
The state that we return is untouched, except for the unfortunate trick we need to do with the NFT, and the addition of the new tokens.
(v, p, AddTokens n) | n > 0 -> Just ( mempty
                                    , State p $
                                      v                                       <>
                                      nft (negate 1)                          <>
                                      assetClassValue (tsToken ts) n
                                    )
For the BuyTokens redeemer, again we check the number of tokens is positive, and again we don’t need any constraints, because anybody can buy tokens.
For the new state, we don’t touch the price. We again correct for the NFT. Then we subtract the tokens that were bought, and we add the lovelace that were paid for them.
(v, p, BuyTokens n) | n > 0 -> Just ( mempty
                                    , State p $
                                      v                                       <>
                                      nft (negate 1)                          <>
                                      assetClassValue (tsToken ts) (negate n) <>
                                      lovelaceValueOf (n * p)
                                    )
Finally, for WithDraw, we insist that the token amount and the lovelace amount are both nonnegative. This time we again add a constraint that the seller must sign the transaction. We modify the state in a similar way to the way we did for the BuyTokens redeemer, but this time we adjust the token and lovelace amounts according to how much has been withdrawn.
(v, p, Withdraw n l) | n >= 0 && l >= 0 -> Just ( Constraints.mustBeSignedBy (tsSeller ts)
                                                , State p $
                                                  v                                       <>
                                                  nft (negate 1)                          <>
                                                  assetClassValue (tsToken ts) (negate n) <>
                                                  lovelaceValueOf (negate l)
                                                )
All other state transitions are illegal.
_ -> Nothing
In this example we are able to construct our state machine more simply that we could in the previous lecture. This is because, in the previous lecture we had one condition that could not be expressed in the regular constraints.
In these situations, there is a helper function called mkStateMachine that takes three arguments. The first one is the state token, the second is the transition function. The last one is to indicate which states are final. In this case, there is no final state. Once this token sale has been setup, it will always be there.
tsStateMachine :: TokenSale -> StateMachine Integer TSRedeemer
tsStateMachine ts = mkStateMachine (Just $ tsNFT ts) (transition ts) (const False)
We can now use the usual boilerplate to turn it into a Plutus smart contract.
type TS = StateMachine Integer TSRedeemer

tsInst :: TokenSale -> Scripts.ScriptInstance TS
tsInst ts = Scripts.validator @TS
    ($$(PlutusTx.compile [|| mkTSValidator ||]) `PlutusTx.applyCode` PlutusTx.liftCode ts)
    $$(PlutusTx.compile [|| wrap ||])
  where
    wrap = Scripts.wrapValidator @Integer @TSRedeemer

tsValidator :: TokenSale -> Validator
tsValidator = Scripts.validatorScript . tsInst

tsAddress :: TokenSale -> Ledger.Address
tsAddress = scriptAddress . tsValidator

tsClient :: TokenSale -> StateMachineClient Integer TSRedeemer
tsClient ts = mkStateMachineClient $ StateMachineInstance (tsStateMachine ts) (tsInst ts)
There are two helper functions to convert specialised error types to Text.
mapErrorC :: Contract w s C.CurrencyError a -> Contract w s Text a
mapErrorC = mapError $ pack . show

mapErrorSM :: Contract w s SMContractError a -> Contract w s Text a
mapErrorSM = mapError $ pack . show
Off-chain code
For the off-chain code, we start by defining a constant for the token name of the NFT.
nftName :: TokenName
nftName = "NFT"
The first contract we define is to start the token sale. This contract is designed to be invoked by the seller.
This first argument is a Maybe CurrencySymbol. The idea here is that if you pass in Nothing, the contract will mint a new NFT. Alternatively, you can provide a Just CurrencySymbol if the token already exists. We have done it this way mainly to make testing easier.
The AssetClass argument is the token the seller wants to trade.
For the return type, we are using the writer monad type with the Last type. The ideas is that once the token sale has been setup, it will get written here so that other contracts are able to discover it. In addition, we return the created token sale.
To begin, we lookup the seller’s public key hash. We then need to get hold of the NFT. So, we determine if we need to mint the NFT, and, if we do, we mint it, otherwise we just use the one that was passed into the function.
startTS :: HasBlockchainActions s => Maybe CurrencySymbol -> AssetClass -> Contract (Last TokenSale) s Text TokenSale
startTS mcs token = do

    pkh <- pubKeyHash <$> Contract.ownPubKey
    cs  <- case mcs of
        Nothing  -> C.currencySymbol <$> mapErrorC (C.forgeContract pkh [(nftName, 1)])
        Just cs' -> return cs'
And now we can define the TokenSale and create the state machine client.
let ts = TokenSale
        { tsSeller = pkh
        , tsToken  = token
        , tsNFT    = AssetClass (cs, nftName)
        }
    client = tsClient ts
We then use the runInitialise function that we discussed in the last lecture, using the client, an initial price of zero, and no initial funds, except for the NFT which will be automatically added.
We write the ts into the log, then log a message, and return the ts.
void $ mapErrorSM $ runInitialise client 0 mempty
tell $ Last $ Just ts
logInfo $ "started token sale " ++ show ts
return ts
The functions for all the other operations are extremely short. This example is ideal for the state machine approach.
They are all very similar. They all invoke runStep and then invoke the correct transition from the state machine.
For example, for setPrice, we need the TokenSale argument to identify the correct contract and the new value of the price. Then we use runStep using the client and SetPrice as the redeemer. We wrap that using mapErrorSM to convert to Text error messages, and we ignore the result.
setPrice :: HasBlockchainActions s => TokenSale -> Integer -> Contract w s Text ()
setPrice ts p = void $ mapErrorSM $ runStep (tsClient ts) $ SetPrice p
The remaining three follow the same pattern.
addTokens :: HasBlockchainActions s => TokenSale -> Integer -> Contract w s Text ()
addTokens ts n = void (mapErrorSM $ runStep (tsClient ts) $ AddTokens n)

buyTokens :: HasBlockchainActions s => TokenSale -> Integer -> Contract w s Text ()
buyTokens ts n = void $ mapErrorSM $ runStep (tsClient ts) $ BuyTokens n

withdraw :: HasBlockchainActions s => TokenSale -> Integer -> Integer -> Contract w s Text ()
withdraw ts n l = void $ mapErrorSM $ runStep (tsClient ts) $ Withdraw n l
Now we define three schemas.
One for the seller which just has one endpoint which takes the CurrencySymbol and the TokenName of the asset to be traded.
type TSStartSchema = BlockchainActions
    .\/ Endpoint "start"      (CurrencySymbol, TokenName)
For testing purposes, we create TSStartSchema’ which additionally takes the CurrencySymbol of the NFT.
type TSStartSchema' = BlockchainActions
    .\/ Endpoint "start"      (CurrencySymbol, CurrencySymbol, TokenName)
Lastly we have a use schema, with endpoints for the four operations - set price, add tokens, buy tokens and withdraw.
type TSUseSchema = BlockchainActions
  .\/ Endpoint "set price"  Integer
  .\/ Endpoint "add tokens" Integer
  .\/ Endpoint "buy tokens" Integer
  .\/ Endpoint "withdraw"   (Integer, Integer)
Now to implement the start endpoint. It simply calls startTs’ and recurses. startTs’ blocks until the parameters are provided and then calls startTs with Nothing, indicating that the NFT has to be minted. We wrap it in handleError and if there is an error, we simply log that error.
startEndpoint :: Contract (Last TokenSale) TSStartSchema Text ()
startEndpoint = startTS' >> startEndpoint
  where
    startTS' = handleError logError $ endpoint @"start"  >>= void . startTS Nothing . AssetClass
The startEndpoint’ function is very similar, but we add the NFT parameter, as per TSStartSchema’.
startEndpoint' :: Contract (Last TokenSale) TSStartSchema' Text ()
startEndpoint' = startTS' >> startEndpoint'
  where
    startTS' = handleError logError $ endpoint @"start"  >>= \(cs1, cs2, tn) ->  void $ startTS (Just cs1) $ AssetClass (cs2, tn)
No surprises in the use endpoints. We give a choice between the four endpoints and just call the functions we defined earlier with the arguments fed in from the endpoint call, and with everything wrapped inside an error handler so that the contract won’t crash in the event of an error.
useEndpoints :: TokenSale -> Contract () TSUseSchema Text ()
useEndpoints ts = (setPrice' `select` addTokens' `select` buyTokens' `select` withdraw') >> useEndpoints ts
  where
    setPrice'  = handleError logError $ endpoint @"set price"  >>= setPrice ts
    addTokens' = handleError logError $ endpoint @"add tokens" >>= addTokens ts
    buyTokens' = handleError logError $ endpoint @"buy tokens" >>= buyTokens ts
    withdraw'  = handleError logError $ endpoint @"withdraw"   >>= uncurry (withdraw ts)
Testing
In order to try it out, let’s run it in the emulator.
We define a runMyTrace function which uses runEmulatorTraceIO’ with a custom emulator configuration and a myTrace function.
runMyTrace :: IO ()
runMyTrace = runEmulatorTraceIO' def emCfg myTrace
Let’s first look at the emCfg function. Recall that this is where we can give custom initial distributions to wallets. Here we give 1000 Ada and 1000 of a custom token to three wallets.
Note
The ability to use underscores in large numbers such as 1000_000_000 is provided by a GHC extension NumericUnderscores
emCfg :: EmulatorConfig
emCfg = EmulatorConfig $ Left $ Map.fromList [(Wallet w, v) | w <- [1 .. 3]]
  where
    v :: Value
    v = Ada.lovelaceValueOf 1000_000_000 <> assetClassValue token 1000

currency :: CurrencySymbol
currency = "aa"

name :: TokenName
name = "A"

token :: AssetClass
token = AssetClass (currency, name)
For the trace, first we activate Wallet 1 using the non-primed startEndpoint function which mints the NFT is minted automatically. Then, we call the start endpoint, giving it the symbol and name of the token we want to sell, and then wait for five slots, although two would be enough in this case.
myTrace :: EmulatorTrace ()
myTrace = do
    h <- activateContractWallet (Wallet 1) startEndpoint
    callEndpoint @"start" h (currency, name)
    void $ Emulator.waitNSlots 5
    Last m <- observableState h
We then read the state, which we wrote using tell, and check to see if it is valid. If it is not, we log an error. If it is, we proceed with the test.
case m of
  Nothing -> Extras.logError @String "error starting token sale"
  Just ts -> do
      Extras.logInfo $ "started token sale " ++ show ts
We can now activate the endpoints for the three wallets. Recall that the useEndpoints function is parameterised by the TokenSale data, which is why we needed to get that value.
h1 <- activateContractWallet (Wallet 1) $ useEndpoints ts
h2 <- activateContractWallet (Wallet 2) $ useEndpoints ts
h3 <- activateContractWallet (Wallet 3) $ useEndpoints ts
Wallet 1 sets the price to 1 Ada and we again wait for a generous amount of time.
callEndpoint @"set price" h1 1_000_000
void $ Emulator.waitNSlots 5
Wallet 1 adds 100 tokens.
callEndpoint @"add tokens" h1 100
void $ Emulator.waitNSlots 5
Wallet 2 buys 20 tokens. So now the contract should contain 80 tokens and 20 Ada.
callEndpoint @"buy tokens" h2 20
void $ Emulator.waitNSlots 5
Wallet 3 buys 5 tokens. Now there should be 75 tokens in the contract and 25 Ada.
callEndpoint @"buy tokens" h3 5
void $ Emulator.waitNSlots 5
Finally, Wallet 1 calls the withdraw endpoint, taking out 40 tokens and 10 Ada. At this point, there should be 35 tokens and 10 Ada in the contract.
callEndpoint @"withdraw" h1 (40, 10_000_000)
void $ Emulator.waitNSlots 5
Let’s run this in the REPL.
cabal repl plutus-pioneer-program-week08-tests
Ok, five modules loaded.
Prelude Main> :l Spec.Trace
Ok, one module loaded.
Prelude Spec.Trace> runMyTrace

Slot 00000: TxnValidate 2125c8770581c6140c3c71276889f6353830744191de0184b6aa00b185004500
Slot 00000: SlotAdd Slot 1
Slot 00001: 00000000-0000-4000-8000-000000000000 {Contract instance for wallet 1}:
  Contract instance started
The first endpoint call is to start. This creates three transaction. Two of these are from the forge contract to create the NFT, and the third one is to set up our initial UTxO for the token sale.
Slot 00001: 00000000-0000-4000-8000-000000000000 {Contract instance for wallet 1}:
  Receive endpoint call: Object (fromList [("tag",String "start"),("value",Object (fromList [("unEndpointValue",Array [Object (fromList [("unCurrencySymbol",String "aa")]),Object (fromList [("unTokenName",String "A")])])]))])
Slot 00001: W1: TxSubmit: cccba8b2abc3e82a735735c2346aa3fcac58152f17854b1745306e5b63a0b965
Slot 00001: TxnValidate cccba8b2abc3e82a735735c2346aa3fcac58152f17854b1745306e5b63a0b965
Slot 00001: SlotAdd Slot 2
Slot 00002: W1: TxSubmit: e23e19192aea3304a989ab98f05e70bc01fe43f3ea940da78a92ab7cebec9bbb
Slot 00002: TxnValidate e23e19192aea3304a989ab98f05e70bc01fe43f3ea940da78a92ab7cebec9bbb
Slot 00002: SlotAdd Slot 3
Slot 00003: W1: TxSubmit: 4cae1c5115eb4128243ce029dcd4d6c23d6497d3ab5e71a79f4dc34e9b8cd763
Slot 00003: TxnValidate 4cae1c5115eb4128243ce029dcd4d6c23d6497d3ab5e71a79f4dc34e9b8cd763
Slot 00003: SlotAdd Slot 4
Slot 00004: *** CONTRACT LOG: "started token sale TokenSale {tsSeller = 21fe31dfa154a261626bf854046fd2271b7bed4b6abe45aa58877ef47f9721b9, tsToken = (aa,\"A\"), tsNFT = (65b4199f7d025bfb3b065b0fb88a77d694ffd849ff740b1a4cc453bfaab30f55,\"NFT\")}"
Slot 00004: SlotAdd Slot 5
Slot 00005: SlotAdd Slot 6
We successfully read the TokenSale value from the observable state, and start the three contract instances for the use contract.
Slot 00006: 00000000-0000-4000-8000-000000000000 {Contract instance for wallet 1}:
  Sending contract state to Thread 0
Slot 00006: SlotAdd Slot 7
Slot 00007: *** USER LOG: started token sale TokenSale {tsSeller = 21fe31dfa154a261626bf854046fd2271b7bed4b6abe45aa58877ef47f9721b9, tsToken = (aa,"A"), tsNFT = (65b4199f7d025bfb3b065b0fb88a77d694ffd849ff740b1a4cc453bfaab30f55,"NFT")}
Slot 00007: 00000000-0000-4000-8000-000000000001 {Contract instance for wallet 1}:
  Contract instance started
Slot 00007: 00000000-0000-4000-8000-000000000002 {Contract instance for wallet 2}:
  Contract instance started
Slot 00007: 00000000-0000-4000-8000-000000000003 {Contract instance for wallet 3}:
  Contract instance started
Then we set the price.
Slot 00007: 00000000-0000-4000-8000-000000000001 {Contract instance for wallet 1}:
  Receive endpoint call: Object (fromList [("tag",String "set price"),("value",Object (fromList [("unEndpointValue",Number 1000000.0)]))])
Slot 00007: W1: TxSubmit: 2de6dd820e6939b4b1f9e162c0e2cc878cc38ea1231a9be610315da4eda06714
Slot 00007: TxnValidate 2de6dd820e6939b4b1f9e162c0e2cc878cc38ea1231a9be610315da4eda06714
Slot 00007: SlotAdd Slot 8
Slot 00008: SlotAdd Slot 9
Slot 00009: SlotAdd Slot 10
Slot 00010: SlotAdd Slot 11
Slot 00011: SlotAdd Slot 12
Then add some tokens.
Slot 00012: 00000000-0000-4000-8000-000000000001 {Contract instance for wallet 1}:
  Receive endpoint call: Object (fromList [("tag",String "add tokens"),("value",Object (fromList [("unEndpointValue",Number 100.0)]))])
Slot 00012: W1: TxSubmit: 42f1bebe285d1ea23bd90683d110866bb438eede8ef62eaf5e9e3d65eec18e90
Slot 00012: TxnValidate 42f1bebe285d1ea23bd90683d110866bb438eede8ef62eaf5e9e3d65eec18e90
Slot 00012: SlotAdd Slot 13
Slot 00013: SlotAdd Slot 14
Slot 00014: SlotAdd Slot 15
Slot 00015: SlotAdd Slot 16
Slot 00016: SlotAdd Slot 17
Then the two buys by Wallets 2 and 3.
Slot 00017: 00000000-0000-4000-8000-000000000002 {Contract instance for wallet 2}:
  Receive endpoint call: Object (fromList [("tag",String "buy tokens"),("value",Object (fromList [("unEndpointValue",Number 20.0)]))])
Slot 00017: W2: TxSubmit: 30d28ca855a14accbb11deee682b174adffb548922e1d4257242880f28328f8e
Slot 00017: TxnValidate 30d28ca855a14accbb11deee682b174adffb548922e1d4257242880f28328f8e
Slot 00017: SlotAdd Slot 18
Slot 00018: SlotAdd Slot 19
Slot 00019: SlotAdd Slot 20
Slot 00020: SlotAdd Slot 21
Slot 00021: SlotAdd Slot 22
Slot 00022: 00000000-0000-4000-8000-000000000003 {Contract instance for wallet 3}:
  Receive endpoint call: Object (fromList [("tag",String "buy tokens"),("value",Object (fromList [("unEndpointValue",Number 5.0)]))])
Slot 00022: W3: TxSubmit: 708b0c4117ad3b38b69254a714e4695c574af404c3fff0eda859b571218b003c
Slot 00022: TxnValidate 708b0c4117ad3b38b69254a714e4695c574af404c3fff0eda859b571218b003c
Slot 00022: SlotAdd Slot 23
Slot 00023: SlotAdd Slot 24
Slot 00024: SlotAdd Slot 25
Slot 00025: SlotAdd Slot 26
Slot 00026: SlotAdd Slot 27
And finally, the withdraw by Wallet 1.
Slot 00027: 00000000-0000-4000-8000-000000000001 {Contract instance for wallet 1}:
  Receive endpoint call: Object (fromList [("tag",String "withdraw"),("value",Object (fromList [("unEndpointValue",Array [Number 40.0,Number 1.0e7])]))])
Slot 00027: W1: TxSubmit: a42a06cc3e3b1653ec4aba5ab8304484d778adcbddac2ceb9f639f7e4bd1dfd2
Slot 00027: TxnValidate a42a06cc3e3b1653ec4aba5ab8304484d778adcbddac2ceb9f639f7e4bd1dfd2
Slot 00027: SlotAdd Slot 28
Slot 00028: SlotAdd Slot 29
Slot 00029: SlotAdd Slot 30
Slot 00030: SlotAdd Slot 31
Slot 00031: SlotAdd Slot 32
Slot 00032: SlotAdd Slot 33
All wallets initially owned 1000 tokens and 1000 Ada. Wallet 1 added 100 tokens to the contract, but then in the last step retrieved 40 tokens and 10 Ada, and so we see its final balance as 940 tokens and 1010 Ada minus transaction fees.
Final balances
Wallet 1:
    {aa, "A"}: 940
    {, ""}: 1009942570
Wallet 2 bought 20 tokens and paid 20 Ada for them, plus some transaction fees.
Wallet 2:
    {aa, "A"}: 1020
    {, ""}: 979985260
Wallet 3 bought 5 tokens for 5 Ada.
Wallet 3:
    {aa, "A"}: 1005
    {, ""}: 994985211
Finally, the script still contains the NFT, which will forever stay there, plus 35 tokens and 15 Ada. There were, at one point, 75 tokens and 25 Ada, before Wallet 1 made a withdrawal.
Script fb3eca878d177b6d9264c7c36845fb1e28935553812ed2b56e39c9c4564b85ad:
    {65b4199f7d025bfb3b065b0fb88a77d694ffd849ff740b1a4cc453bfaab30f55, "NFT"}: 1
    {aa, "A"}: 35
    {, ""}: 15000000
Unit Testing
Tasty
You can find tasty on Hackage.
There is also some example code on the same page.
Basically you have a main program that references some tests of type TestTree. As the name suggests, this allows for a tree of tests, where you can have sub groups and sub-sub groups and so on.
main = defaultMain tests

tests :: TestTree
tests = testGroup "Tests" [properties, unitTests]
There is special support for tests in Plutus in the plutus-contract package in
module Plutus.Contract.Test
There are various types of tests that are supported, but here we will only look at two of those. One that works with emulator traces, and one which is much more sophisticated and uses so-called property-based testing.
This module gives us functions for checking predicates, for example
checkPredicate :: String -> TracePredicate -> EmulatorTrace () -> TestTree
Here we see the connection with Tasty. It takes, as arguments, the descriptive name of the test, then a TracePredicate which we will get to in a moment, and an EmulatorTrace like the one we have used to test our contracts previously. And the result is a TestTree which, as we have seen, is the type of tests that Tasty uses. So, using this checkPredicate function we can produce something that the Tasty framework can understand.
There’s also a variant with one additional argument of CheckOptions
checkPredicateOptions :: CheckOptions -> String -> TracePredicate -> EmulatorTrace () -> TestTree
CheckOptions has no constructors. This is a bit unfortunate, as we are forced to interact with it via three operations that take a type Lens’. Lens’ is related to something called optics in Haskell. Optics is a huge topic in itself, with whole books haven been written about it, so we will just touch on it for now and just learn how to use the emulator trace.
One of its operations is emulatorConfig which allows us to specify initial distributions of funds, in a way similar to that which we have done in previous testing examples.
emulatorConfig :: Lens' CheckOptions EmulatorConfig
Now let’s look at TracePredicate. This specifies some condition that the emulator trace should satisfy. This is what will be tested when we run the test.
First of all we see some logical combinators - a logical not and a logical and.
not :: TracePredicate -> TracePredicate
(.&&.) :: TracePredicate -> TracePredicate -> TracePredicate
There are lots of functions for producing TracePredicates. A few example are
endpointAvailable :: forall (l :: Symbol) w s e a. ( HasType l Endpoints.ActiveEndpoint (Output s), KnownSymbol l, ContractConstraints s, Monoid w )
  => Contract w s e a -> ContractInstanceTag -> TracePredicate
queryingUtxoAt :: forall w s e a. ( UtxoAt.HasUtxoAt s, ContractConstraints s, Monoid w )
  => Contract w s e a -> ContractInstanceTag -> Address -> TracePredicate
assertDone :: forall w s e a. ( ContractConstraints s, Monoid w )
  => Contract w s e a -> ContractInstanceTag -> (a -> Bool) -> String -> TracePredicate
For our example, we will only use one of the available checks, walletFundsChange, which checks funds.
-- | Check that the funds in the wallet have changed by the given amount, exluding fees.
walletFundsChange :: Wallet -> Value -> TracePredicate
The walletFundsChange creates a TracePredicate that checks whether the funds in a Wallet have changed by a given Value. Interestingly, here, fees are ignored. We would have a hard time writing precise tests if this were not the case - we would find ourselves needing to approximate the costs of fees without knowing exactly what they would be.
There is a variation walletFundsExactChange, which does take fees into account.
If we go back to our test module Spec.Trace there is a function that we have not looked at yet, tests, and it uses this checkPredicateOptions.
tests :: TestTree
tests = checkPredicateOptions
    (defaultCheckOptions & emulatorConfig .~ emCfg)
    "token sale trace"
    (     walletFundsChange (Wallet 1) (Ada.lovelaceValueOf   10_000_000  <> assetClassValue token (-60))
    .&&. walletFundsChange (Wallet 2) (Ada.lovelaceValueOf (-20_000_000) <> assetClassValue token   20)
    .&&. walletFundsChange (Wallet 3) (Ada.lovelaceValueOf (- 5_000_000) <> assetClassValue token    5)
    )
    myTrace
The first argument, as we have seen is of type CheckOptions. This is where we have to use optics, but we won’t go into the details of that here. It is sufficient for now to note that we use the same EmulatorConfig as we used for runMyTrace.
The second argument is the descriptive name of the trace.
For the third argument, we use the (.&&.) combinator to chain together three different trace predicates, each of which uses the walletFundsChange function we saw above. Here we specify the changes that we expect to see in each of the wallets at the end of the trace - for example, we expect Wallet 1 to have gained 10 Ada and lost 60 Tokens.
We can now run this in the REPL.
Prelude Spec.Trace> import Test.Tasty
Prelude Test.Tasty Spec.Trace> defaultMain tests
token sale trace: OK (1.22s)

All 1 tests passed (1.22s)
*** Exception: ExitSuccess
This passes. Let’s see what happens if it doesn’t pass. We can change one of the values.
( walletFundsChange (Wallet 1) (Ada.lovelaceValueOf 10_000_000 <> assetClassValue token (-50) )
Prelude Test.Tasty Spec.Trace> :l Spec.Trace
[1 of 1] Compiling Spec.Trace       ( test/Spec/Trace.hs, /home/chris/git/ada/pioneer-fork/code/week08/dist-newstyle/build/x86_64-linux/ghc-8.10.4.20210212/plutus-pioneer-program-week08-0.1.0.0/t/plutus-pioneer-program-week08-tests/build/plutus-pioneer-program-week08-tests/plutus-pioneer-program-week08-tests-tmp/Spec/Trace.o )
Ok, one module loaded.
Prelude Test.Tasty Spec.Trace> defaultMain tests
token sale trace: FAIL (1.32s)
  Expected funds of W1 to change by
    Value (Map [(,Map [("",10000000)]),(aa,Map [("A",-50)])])
    (excluding 57430 lovelace in fees)
  but they changed by
    Value (Map [(,Map [("",10000000)]),(aa,Map [("A",-60)])])
  Test failed.
  Emulator log:

  [INFO] Slot 0: TxnValidate 2125c8770581c6140c3c71276889f6353830744191de0184b6aa00b185004500
  [INFO] Slot 1: 00000000-0000-4000-8000-000000000000 {Contract instance for wallet 1}:
                   Contract instance started
  [INFO] Slot 1: 00000000-0000-4000-8000-000000000000 {Contract instance for wallet 1}:
                   Receive endpoint call: Object (fromList [("tag",String "start"),("value",Object (fromList [("unEndpointValue",Array [Object (fromList [("unCurrencySymbol",String "aa")]),Object (fromList [("unTokenName",String "A")])])]))])
  [INFO] Slot 1: W1: Balancing an unbalanced transaction:
  ...
  ...
  [INFO] Slot 27: W1: TxSubmit: a42a06cc3e3b1653ec4aba5ab8304484d778adcbddac2ceb9f639f7e4bd1dfd2
  [INFO] Slot 27: TxnValidate a42a06cc3e3b1653ec4aba5ab8304484d778adcbddac2ceb9f639f7e4bd1dfd2
    src/Plutus/Contract/Test.hs:245:
    token sale trace

1 out of 1 tests failed (1.32s)
*** Exception: ExitFailure 1
We see a nice error message, followed by the emulator log, which we didn’t get when the tests passed.
This is probably the simplest way to write automated tests for Plutus contracts. You simply write one or more emulator traces, and then use checkPredicate in association with the appropriate test predicates, to check that the trace leads to the desired result. This lets us write more or less traditional unit tests.
Optics and Lenses
Before we get to the second way of testing Plutus contracts, we will take a brief look at optics and lenses.
There are various competing optics libraries on Hackage, but the most prominent, and the most infamous one, and the one that the Plutus team decided to use is called Lens.
Lens is authored by Edward Kmett, who is probably the most prolific contributor to Haskell libraries.
You can see on the Hackage page there is a scary diagram. There is a whole zoo of optics. There are lenses and prisms and traversals and isos and whatnot. This diagram shows some of the operations that the library provides.
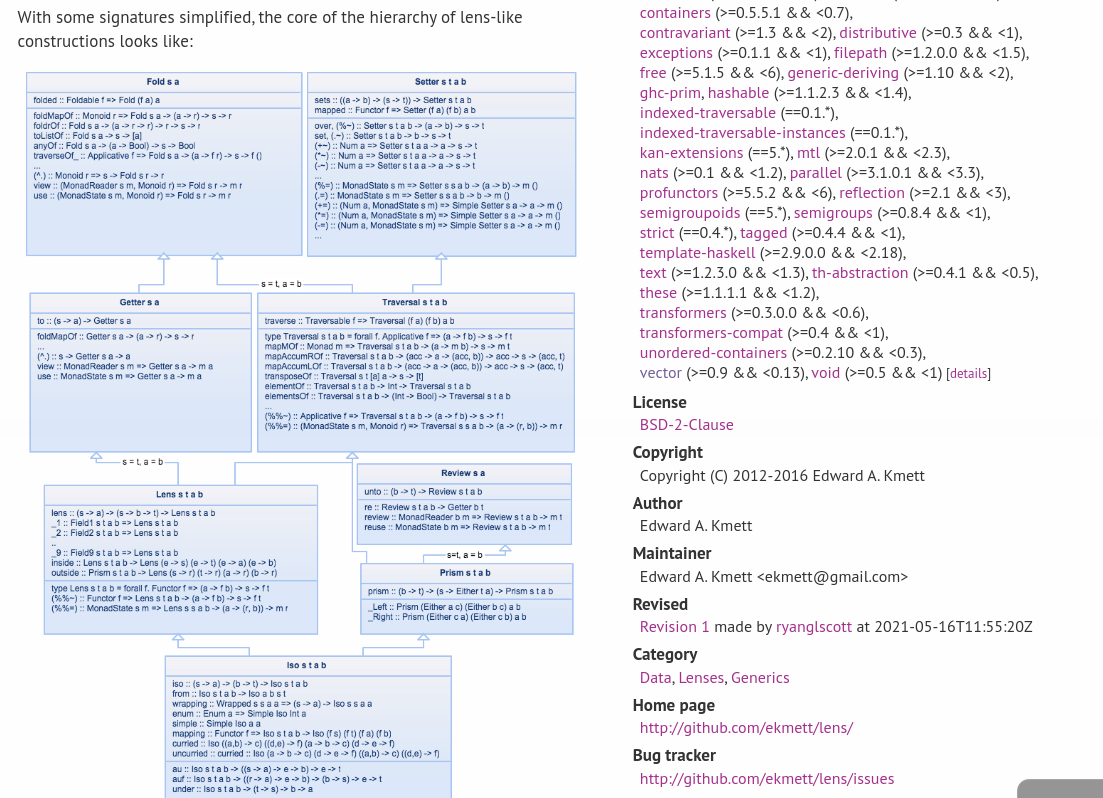
Optics are all about reaching deeply into hierarchical data types to inspect parts that are hidden deeply in the data type and to manipulate them.
Let’s look at a very simple example in
module Week08.Lens
We have a type Company which is a wrapper around a list of Person. There is a field _staff. When dealing with lenses, it is convention to start field names with underscores.
newtype Company = Company {_staff :: [Person]} deriving Show

data Person  = Person
    { _name    :: String
    , _address :: Address
    } deriving Show

newtype Address = Address {_city :: String} deriving Show
And we define two Persons and a Company with which these Persons are associated.
alejandro, lars :: Person
alejandro = Person
  {  _name    = "Alejandro"
  ,  _address = Address {_city = "Zacateca"}
  }
lars = Person
  {  _name    = "Lars"
  ,  _address = Address {_city = "Regensburg"}
  }

iohk :: Company
iohk = Company { _staff = [alejandro, lars] }
The task is to write a simple function, goTo, that gets a String as argument along with a Company. The function should create a new company which it gets by changing all the cities of all the staff of the company with the given string.
If we apply that to iohk with a string argument of “Athens*, then we should get a Company with the same two Persons, but now both of those Persons have a city of “Athens”.
You don’t need any advanced Haskell to achieve this, but it’s a bit messy, even in this simple example. The function below uses record syntax to modify specific fields of records, while leaving the other fields the same.
The helper function movePerson updates the _address field of the Person p, and the _city field of that Address, and the main part of the function maps the movePerson function over each member of _staff.
goTo :: String -> Company -> Company
goTo there c = c {_staff = map movePerson (_staff c)}
  where
    movePerson p = p {_address = (_address p) {_city = there}}
We can look at the original company in the REPL.
Prelude Week08.Lens> iohk
Company {_staff = [Person {_name = "Alejandro", _address = Address {_city = "Zacateca"}},Person {_name = "Lars", _address = Address {_city = "Regensburg"}}]}
Now, let’s apply the goTo function to it, and see the changes.
Prelude Week08.Lens> goTo "Athens" iohk
Company {_staff = [Person {_name = "Alejandro", _address = Address {_city = "Athens"}},Person {_name = "Lars", _address = Address {_city = "Athens"}}]}
So, dealing with nested record types, even though it is quite simple conceptually, can be quite messy.
This is what optics try to make easier with the idea of providing first-class field accessors. In the end it’s very similar to dealing with such data types in an imperative language such as C# or Java.
We saw in lecture four how monads can be viewed as a programmable semi-colon, where the semi-colon is the statement separator in many imperative languages. In a similar way, optics can be thought of as providing a programmable dot, where a dot is the accessor dot as in Python or Java.
You could implement lenses by hand, but the lens library provides some Template Haskell magic to do it automatically, so long as we follow the underscore convention mentioned above.
makeLenses ''Company
makeLenses ''Person
makeLenses ''Address
The names of the lenses will be the names of the original fields without the underscore.
There is a way, within the REPL, to inspect what code Template Haskell writes at compile time.
First, enable the following flag
Prelude Week08.Lens> :set -ddump-splices
Then, reload the module. If nothing happens, you’ll need to make a minor change to the code, perhaps by adding some whitespace, before reloading.
Prelude Week08.Lens> :r
[4 of 4] Compiling Week08.Lens      ( src/Week08/Lens.hs, /home/chris/git/ada/pioneer-fork/code/week08/dist-newstyle/build/x86_64-linux/ghc-8.10.4.20210212/plutus-pioneer-program-week08-0.1.0.0/build/Week08/Lens.o )
src/Week08/Lens.hs:35:1-20: Splicing declarations
    makeLenses ''Company
  ======>
    staff :: Iso' Company [Person]
    staff = (iso (\ (Company x_abBO) -> x_abBO)) Company
    {-# INLINE staff #-}
src/Week08/Lens.hs:36:1-19: Splicing declarations
    makeLenses ''Person
  ======>
    address :: Lens' Person Address
    address f_abEJ (Person x1_abEK x2_abEL)
      = (fmap (\ y1_abEM -> (Person x1_abEK) y1_abEM)) (f_abEJ x2_abEL)
    {-# INLINE address #-}
    name :: Lens' Person String
    name f_abEN (Person x1_abEO x2_abEP)
      = (fmap (\ y1_abEQ -> (Person y1_abEQ) x2_abEP)) (f_abEN x1_abEO)
    {-# INLINE name #-}
src/Week08/Lens.hs:37:1-20: Splicing declarations
    makeLenses ''Address
  ======>
    city :: Iso' Address String
    city = (iso (\ (Address x_abFw) -> x_abFw)) Address
    {-# INLINE city #-}
This now shows us what Template Haskell does.
We see that makeLenses for Company creates a function staff, which returns an Iso’ - a type of optic - from Company to [Person].
For makeLenses Person we get an address function which returns a Lens’ from Person to Address, and we also get a name lens from Person to String.
For makeLenses Address we get a city function which returns an Iso’ from Address to String.
Iso and Lens are two different types of optics but the order of type arguments is always the same. You always have two type arguments, at least for these primed versions (there are more general optics which take four type parameters). The first argument is always the big data type and the second parameter is the part you are zooming into. The name optics relates to the mental image of zooming into a datatype.
Let’s try them out in the REPL.
Prelude Week08.Lens> lars
Person {_name = "Lars", _address = Address {_city = "Regensburg"}}

Prelude Week08.Lens> import Control.Lens

Prelude Control.Lens Week08.Lens> lars ^. name
"Lars"

Prelude Control.Lens Week08.Lens> lars ^. address
Address {_city = "Regensburg"}
A very powerful feature of lenses is that you can compose them.
Where we have, above, something going from Person to Address and we have something else going from Address to String, then we can combine them using the function composition dot. There is some advanced type-level machinery going on behind the scenes to make that work, but it works.
Prelude Control.Lens Week08.Lens> lars ^. address . city
"Regensburg"
Not only can you view the contents of record types like this, but you can also manipulate them.
Prelude Control.Lens Week08.Lens> lars & name .~ "LARS"
Person {_name = "LARS", _address = Address {_city = "Regensburg"}}
The & symbol here is function application, but the other way around - the argument comes first and then the function.
Again, we can compose.
Prelude Control.Lens Week08.Lens> lars & address . city .~ "Munich"
Person {_name = "Lars", _address = Address {_city = "Munich"}}
There is another type of optics called Traversables, that zooms not only into one field, but into many simultaneously. If you had a list it would zoom into each element. So, for example, we could use a list of integers, with the each traversable that works with many container types, including lists, and set every element to 42.
Prelude Control.Lens Week08.Lens> [1 :: Int, 3, 4] & each .~ 42
[42,42,42]
You may see a type-defaults warning when you run the above, but it is removed here.
A cool thing is that various types of lenses can be combined, again with the dot operator. For example
Prelude Control.Lens Week08.Lens> iohk & staff . each . address . city .~ "Athens"
Company {_staff = [Person {_name = "Alejandro", _address = Address {_city = "Athens"}},Person {_name = "Lars", _address = Address {_city = "Athens"}}]}
And this is exactly what our goTo function achieved, so we can write goTo’ as
goTo' :: String -> Company -> Company
goTo' there c = c & staff . each . address . city .~ there
And this is actually what we did when we configured our test.
tests :: TestTree
tests = checkPredicateOptions
    (defaultCheckOptions & emulatorConfig .~ emCfg)
The function defaultCheckOptions is of type CheckOptions and there is a lens from CheckOptions to EmulatorConfig, and this is the part that we wanted to change.
And that concludes our brief excursion into optics and lenses.
Property Based Testing
Property Based Testing is quite a revolutionary approach to testing that is much more powerful than simple unit testing. It originated from Haskell, which, with its pureness and immutable data structures is particularly suited to this approach. It has now been copied by almost all other programming languages.
QuickCheck
One of the inventors of QuickCheck, which is the most prominent and was the first library using this approach, is John Hughes, who is also one of the original inventors of Haskell. He and his company work with IOHK to provide special support of this approach to testing Plutus contracts.
Before we look at using QuickCheck for Plutus contracts, let’s first look at its use for pur Haskell programs.
Property based testing subsumes unit tests. Let’s write a very simple and silly unit test.
prop_simple :: Bool
prop_simple = 2 + 2 == (4 :: Int)
This function is available in the module.
module Week08.QuickCheck
After loading this module, and the Test.QuickCheck module, we can test our unit test in the REPL.
Prelude Control.Lens Test.QuickCheck Week08.QuickCheck> quickCheck prop_simple
+++ OK, passed 1 test.
This is not very exciting. For a more interesting example, the same module contains a buggy implementation of an insertion sort.
sort :: [Int] -> [Int] -- not correct
sort []     =  []
sort (x:xs) =  insert x xs

insert :: Int -> [Int] -> [Int] -- not correct
insert x []                     =  [x]
insert x (y:ys)  | x <= y       =  x : ys
                 | otherwise    =  y : insert x ys
To test it, a property that would could test would be that after applying sort to a list of integers, the resulting list is sorted.
isSorted :: [Int] -> Bool
isSorted []           = True
isSorted [_]          = True
isSorted (x : y : ys) = x <= y && isSorted (y : ys)
Using this, we can now provide a QuickCheck property that is not just simply of type Bool, but instead is a function from a list of Ints to Bool.
prop_sort_sorts :: [Int] -> Bool
prop_sort_sorts xs = isSorted $ sort xs
You can read that like a specification, which says “for all the lists of integers xs, if you apply sort to it, then the result should be sorted.”
QuickCheck can deal with such properties.
In the REPL
Prelude Control.Lens Test.QuickCheck Week08.QuickCheck> quickCheck prop_sort_sorts
*** Failed! Falsified (after 8 tests and 4 shrinks):
[0,0,-1]
It fails, and gives us an example where the property does not hold. We can test that example.
Prelude Control.Lens Test.QuickCheck Week08.QuickCheck> sort [0, 0, -1]
[0,-1]
And can see that, indeed, it is not correct.
How does QuickCheck do this? If you provide a function with one or more arguments, it will generate random arguments for the function. In our example, QuickCheck has generated 100 random lists of integers and, for each of those lists, has checked whether the property holds, until it hit a failure.
Note that the failure was reported as
*** Failed! Falsified (after 8 tests and 4 shrinks):
This means that after 8 tests the property was falsified, but at this point, rather than just report the failure, it has tried to shrink it - to simplify it.
This is a powerful feature of QuickCheck, because the random counter examples that QuickCheck finds are very complicated - long lists with long numbers. But once a counter example has been found, QuickCheck tries to simplify it, perhaps by dropping some elements from the list, or by making some of the numbers smaller, until it doesn’t find a way to get an even simpler example.
It is this combination of random test generation and shrinking that makes QuickCheck so tremendously useful.
We can see what type of random lists QuickCheck generates.
Prelude Control.Lens Test.QuickCheck Week08.QuickCheck> sample (arbitrary :: Gen [Int])
[]
[0]
[2,4,-1,3]
[3,-1,4,3,-5]
[3,-1,-8,-4,-6]
[4,5,-1,4,-7,2,8,4,-5]
[-8,-8,-11,-12,2,-4,-12,2,4]
[7,9,3,-5,5,-9,3,1,11]
[12,-7,-9,9,-11,-15,5,-10,-7,4,8,8,-12,-6,16]
[-11,11,-1,-6]
[14,2,-5,9,13,-8,-8,-17,-1,-11,-19,15,9,8,-19,-4,16,4,4,19]
The way QuickCheck does this random generation is by using a type class called Arbitrary
Prelude Control.Lens Test.QuickCheck Week08.QuickCheck> :i Arbitrary
type Arbitrary :: * -> Constraint
class Arbitrary a where
  arbitrary :: Gen a
  shrink :: a -> [a]
There are many more lines to the above output, but the important ones are shown. We can see that it has two methods. One is called arbitrary and one is called shrink.
Gen is yet another monad. The monad provides various methods that allow for random number generation for values of type a.
The second method is shrink, which, when given an a will provide a list of simpler versions of a. This, of course, depends on the type of a.
If we look at the output above that provides some random integer lists, we see something interesting. The further we go down the list, the more complicated the list becomes. The first is just the empty list, then we get single-element lists, then some longer lists, and it tends towards greater complexity over time.
In addition to just providing random generation in the Gen monad, there is also a concept of complexity. If you implement an instance of Gen you are expected not only to generate a random a but also a random a of some given complexity.
When QuickCheck checks a property, it starts with simple, random arguments, then makes them more complex over time. By default it tests 100 random arguments, but this can be configured.
Now that we know that our code fails, let’s try to fix it.
sort :: [Int] -> [Int] -- not correct
sort []     =  []
sort (x:xs) =  insert x xs
The problem is that all we do for a non-empty list is to insert the first element into the tail, but we don’t recursively sort the tail.
Our first attempt to fix…
sort :: [Int] -> [Int]
sort []     =  []
sort (x:xs) =  insert x $ sort xs
Now, when we test this…
Prelude Control.Lens Test.QuickCheck> :r
[1 of 1] Compiling Week08.QuickCheck ( src/Week08/QuickCheck.hs, /home/chris/git/ada/pioneer-fork/code/week08/dist-newstyle/build/x86_64-linux/ghc-8.10.4.20210212/plutus-pioneer-program-week08-0.1.0.0/build/Week08/QuickCheck.o )
Ok, one module loaded.
Prelude Control.Lens Test.QuickCheck Week08.QuickCheck> quickCheck prop_sort_sorts
+++ OK, passed 100 tests.
It passes. However, if we test specifically for the case that failed previously…
Prelude Control.Lens Test.QuickCheck Week08.QuickCheck> sort [0, 0, -1]
[-1,0]
It is clearly not correct. Even though the list has been sorted, the length of the list has changed. This leads to an important point. QuickCheck can’t do magic - its results are only as good as the properties we provide. What we see here is that our property prop_sort_sorts is not strong enough to test if the function is correct.
We can add a second property that checks the length.
prop_sort_preserves_length :: [Int] -> Bool
prop_sort_preserves_length xs = length (sort xs) == length xs
And we find that this property is not satisfied by our code.
Prelude Control.Lens Test.QuickCheck Week08.QuickCheck> quickCheck prop_sort_preserves_length
*** Failed! Falsified (after 4 tests and 3 shrinks):
[0,0]
The bug in our code is in the insert function.
insert :: Int -> [Int] -> [Int] -- not correct
insert x []                     =  [x]
insert x (y:ys)  | x <= y       =  x : ys
                 | otherwise    =  y : insert x ys
We say here that, if x is less or equal to y, then we append x to ys, but we have forgotten about the y. It should read:
insert x (y:ys) | x <= y = x : y : ys
This should fix it.
Prelude Control.Lens Test.QuickCheck Week08.QuickCheck> :r
Prelude Control.Lens Test.QuickCheck Week08.QuickCheck> quickCheck prop_sort_preserves_length
+++ OK, passed 100 tests.
Of course, this is still not proof that our function is correct, because these two properties are still not enough to specify a sorting function fully. For example, the sorting function could return a list of the same length containing only zeroes. This would pass all tests. It is quite an art to find properties to guarantee that, if they are all satisfied, there is no bug.
Even so, this approach to testing is often more effective than unit testing as it can test a huge number of random cases and can find examples of failure which a programmer writing a unit test may not have thought of.
Using QuickCheck with Plutus
Now that we have seen what QuickCheck can do, we will turn our attention to using it to test Plutus contracts.
Here we hit a problem - how do you use QuickCheck to test side-effected code? This problem does not only arise with blockchain, it arises with all systems that use IO.
John Hughes always uses the example of the file system. How would you test file system operations, i.e. reading, writing, opening and closing files, using QuickCheck.
The approach to use is very similar to the one you can use with Plutus. The idea is that you start with a model.
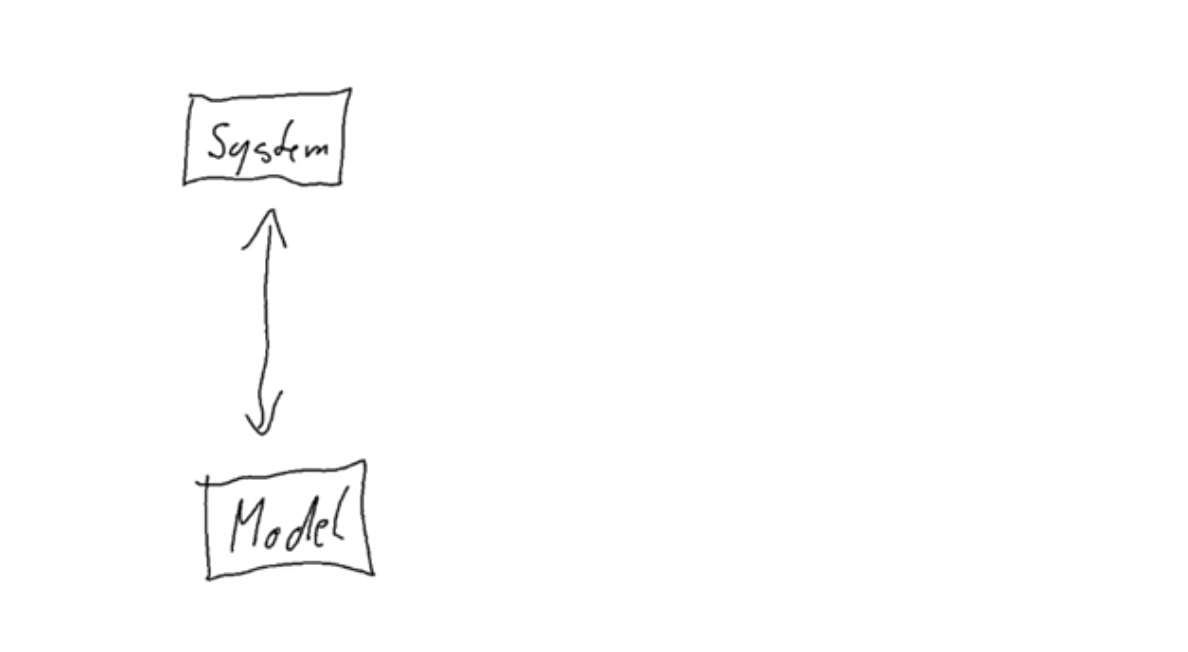
The model is basically an idealised model of how the real world system should work. There must be some sort of relation between the model and the real system.
If the real system is a file system, then you could, in the model, have an idealised version of how you think files should work. And then, what QuickCheck does, in its random generation, is to generate a random sequence of actions that you can perform on the system. In the example of a file system, it would randomly generate a sequence of opening files, closing files, writing to files, reading files and so on. Now you can basically step this model and the system in parallel.
You have some sort of action that you perform in the real world, and you apply the same type of action to your model. Then your real system has progressed into a new state, and your model has also been updated. After this step, you can compare the two and check that they are still in sync. You can then continue this for several steps.
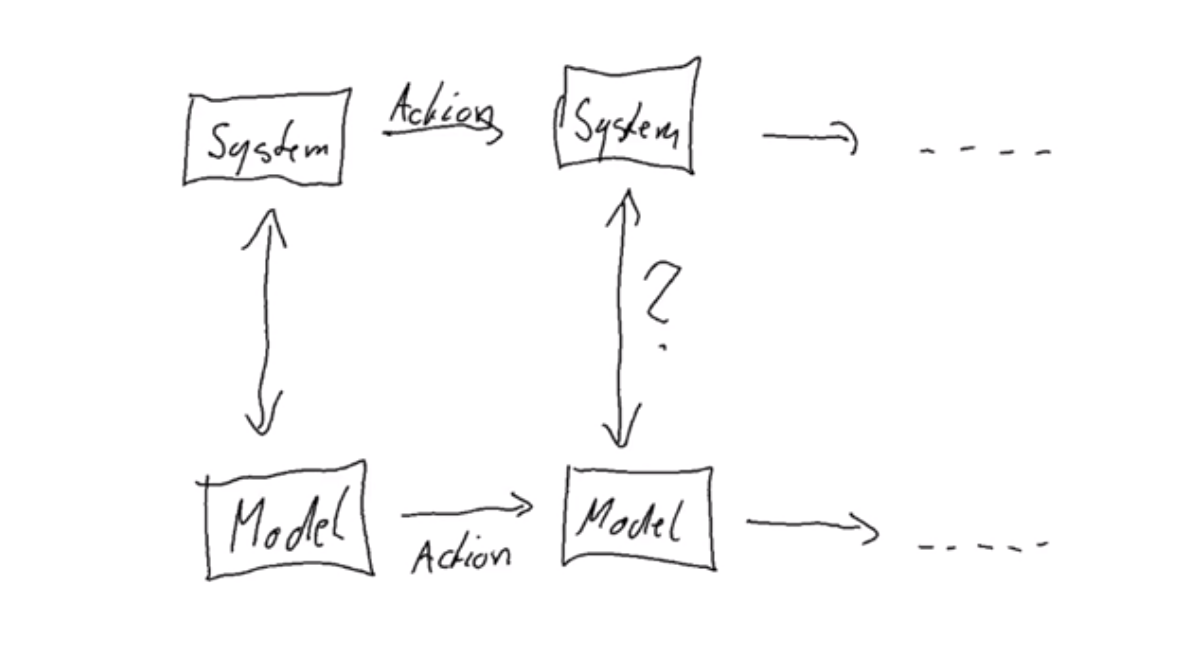
While our first QuickCheck example generated a random list of Ints, the idea for testing a real world system is to generate random lists of actions and then to apply those actions both to a model and to the real system and to check that the model and the real system stay in sync.
Shrinking in this example would be that, if you have a list of actions that show that there is a bug, then you can, for example, drop some of the actions and see whether the problem still arises. This can be repeated until you cannot drop any further actions from the list and still reproduce the bug.
This is exactly how the QuickCheck support for Plutus works. In order to test a Plutus contract, we have to come up with a model and define our expectations of how the various endpoints, for example, would change the model. We would then need to provide a link between the model and the real system (the emulator), and then apply the QuickCheck machinery.
The code to do this is in
module Spec.Model
We notice that we import two Plutus test modules, with the QuickCheck support being provided by the ContractModel, which has all the machinery to define a model and to link it to a real contract.
import           Plutus.Contract.Test
import           Plutus.Contract.Test.ContractModel
And we import three more test modules. One for Tasty, one for QuickCheck, and one that allows for using QuickCheck properties in Tasty test suites.
import           Test.QuickCheck
import           Test.Tasty
import           Test.Tasty.QuickCheck
To define a model, we first define a datatype that represents the state of one TokenSale instance.
data TSState = TSState
  { _tssPrice    :: !Integer
  , _tssLovelace :: !Integer
  , _tssToken    :: !Integer
  } deriving Show
It has three fields - the current price, the current supply of lovelace in the contract, and the current supply of tokens in the contract.
Then our model TSModel is a map from wallets to TokenSale states.
newtype TSModel = TSModel {_tsModel :: Map Wallet TSState}
deriving Show
The idea in this test is that we have two wallets and each wallet runs its own TokenSale contract, and the two wallets will trade different tokens.
We create lenses for the model. We need optics to interact with the ContactModel library.
makeLenses ''TSModel
All the logic that defines how our model should behave, and how it is linked to the real contract is in
instance ContractModel TSModel where
First we have an associated datatype. This is quite an advanced Haskell feature. In type classes, as well as methods, you can have data types. We have seen this before in validators where we define a dummy type that provides a link between the datum type and the redeemer type.
Here, we associate an Action type, which represents the actions that QuickCheck will generate. In principal, we just have one constructor in the Action type for each of the endpoints we saw earlier. We have additional arguments because now there are additional wallets at play and we must keep track of which wallet performs an action.
data Action TSModel =
    Start Wallet
  | SetPrice Wallet Wallet Integer
  | AddTokens Wallet Wallet Integer
  | Withdraw Wallet Wallet Integer Integer
  | BuyTokens Wallet Wallet Integer
deriving (Show, Eq)
Start Wallet means that this wallet starts the token sale contract.
SetPrice Wallet Wallet Integer means that the second wallet sets the price for the token sale contract operated by the first wallet. We know from the contract logic that this should only work if both the wallets are the same, because only the owner of the contract can set the price.
AddTokens is very similar to SetPrice.
For Withdraw, the second wallet attempts to withdraw a certain number of lovelace and a certain number tokens (respectively) from the token sale run by the first wallet. Again, this should fail if the two wallets are not the same.
In BuyTokens, the second wallet will try to buy a certain number of tokens from the token sale run by the first wallet.
So, the Action type is the first ingredient.
The second ingredient is another associated datatype. For each instance of a contract that we are running, we want a key that identifies the instance.
data ContractInstanceKey TSModel w s e where
  StartKey :: Wallet           -> ContractInstanceKey TSModel (Last TokenSale) TSStartSchema' Text
  UseKey   :: Wallet -> Wallet -> ContractInstanceKey TSModel ()               TSUseSchema    Text
This is a generalised, algebraic datatype (GADT), so it’s a little different to usual data declarations in Haskell. Instead of just providing the constructors, you provide the constructors with a type signature.
In ContractInstanceKey, we have a constructor StartKey that takes a Wallet as an argument and then produces something of type
ContractInstanceKey TSModel (Last TokenSale) TSStartSchema' Text
The point of GADTs is that with normal datatypes, the type parameters are the same for all constructors, for example, Action TSModel has five constructors, but the type is always TSModel. But with GADTs, we are able to provide a more generalised type parameter - in this case TSModel w s e.
We need this feature in this case because our contracts can have different type parameters.
There are two types of instances. Recall we have the start contract and the use contract, which have different type signatures.
StartKey returns a type that consists of our model and then the parameters that come from the contract itself - the state type, the schema, and the error type. We used the primed version of TSStartSchema - TSStartSchema’ because we don’t want to create the NFT, we want to pass it in ourselves because it makes it easier to write the test if we know what NFT we will be using in advance.
We also provide a key for the use contract which takes two Wallets as parameters. The first is the one that owns the token sale that we are interacting with and the second is the one that actually runs the contract. As for the type parameters, there is no state parameter, and it uses a different schema - TSUseSchema, but the error type is the same.
Next we need to provide the instanceTag method which, given an instance key and a wallet, will provide a so-called contract instance tag. As we already know the wallet that runs the instance, because that was one of the arguments to the instance key constructor we can ignore it as an argument.
instanceTag key _ = fromString $ "instance tag for: " ++ show key
The instanceTag function doesn’t have an accessible constructor, but it implements the IsString class. We haven’t seen the IsString class explicitly but we have used it when we used the OverloadedStrings GHC extension - it allows a type class that implements it to be represented by a string literal. In particular, it has a method fromString which, given a string, will create an instance of the type.
The “instance tag for: ” literal in the function above isn’t necessary - all that is necessary is for the whole string to be unique for each instance that we will ever run in our tests.
There is a default implementation for the instanceTag method of the ContractModel class, so you normally don’t have to implement it yourself. However, it only works if you have at most one contract instance per wallet. This is not the case for us, as we will have three instances per wallet - one start instance and two use instances (one for the own wallet’s token sale, and one for the other wallet’s token sale).
The next method that we need to implement is arbitraryAction which is how we tell the system how to generate a random action.
arbitraryAction _ = oneof $
   (Start <$> genWallet) :
  [ SetPrice  <$> genWallet <*> genWallet <*> genNonNeg ]               ++
  [ AddTokens <$> genWallet <*> genWallet <*> genNonNeg ]               ++
  [ BuyTokens <$> genWallet <*> genWallet <*> genNonNeg ]               ++
  [ Withdraw  <$> genWallet <*> genWallet <*> genNonNeg <*> genNonNeg ]
As an argument it gets the model state. We will come to this later, but we don’t need it here and so ignore it in the method declaration.
The function oneof is one of the combinators provided by QuickCheck. Given a list of arbitrary actions, it randomly picks one of those.
Here we are using something else that we have not seen before - the applicative style. Recall that when we looked at monads, we saw that Monad has Applicative as a superclass. Applicative is often useful to write more compact monadic code.
First let’s look at the genWallet function.
genWallet :: Gen Wallet
genWallet = elements wallets
In the random generation monad Gen, it generates a random wallet. It uses another combinator provided by QuickCheck, elements, which simply takes a list of the type that we wish to generate, and randomly picks one of those elements.
This is using another helper function wallets.
wallets :: [Wallet]
wallets = [w1, w2]
Which, in turn, uses
w1, w2 :: Wallet
w1 = Wallet 1
w2 = Wallet 2
So genWallet will randomly pick either Wallet 1 or Wallet 2.
Getting back to the arbitraryAction code.
Start <$> genWallet
What this means is that we first use genWallet to generate a random wallet and then return Action Start w, where w is the wallet we have just picked.
The right-hand side is of type Gen Wallet and Start takes a Wallet and returns an action. If we fmap (<$>) this, we get a type of Gen Wallet -> Gen Action, which is what we want.
For the other four actions, we use an additional helper function genNonNeg which generates a nonnegative number.
genNonNeg :: Gen Integer
genNonNeg = getNonNegative <$> arbitrary
Now, when we want to generate a random action for SetPrice, this is where the applicative style really shines.
SetPrice <$> genWallet <*> genWallet <*> genNonNeg
If we wanted to write this in a do block, we would do something like
w1 <- genWallet
w2 <- genWallet
p  <- genNonNeg
return (SetPrice w1 w2 p)
You can use the applicative style if the actions in the monad you are invoking don’t depend on the result of previous actions. In a do block, you could do inspect the the result in w1 and make some choice based upon it. This is not possible in Applicative, but often monadic code doesn’t make use of this power, and in these situations, we have this more compact way of writing it.
We can try out the arbitraryAction function in the REPL.
Prelude Test.QuickCheck Plutus.Contract.Test.ContractModel Spec.Model> sample (arbitraryAction undefined :: Gen (Action TSModel))
Start (Wallet 1)
AddTokens (Wallet 1) (Wallet 1) 1
AddTokens (Wallet 1) (Wallet 1) 3
SetPrice (Wallet 1) (Wallet 2) 3
SetPrice (Wallet 1) (Wallet 1) 2
AddTokens (Wallet 1) (Wallet 1) 1
SetPrice (Wallet 2) (Wallet 1) 12
Withdraw (Wallet 2) (Wallet 1) 14 3
AddTokens (Wallet 2) (Wallet 1) 9
AddTokens (Wallet 2) (Wallet 1) 18
SetPrice (Wallet 2) (Wallet 1) 17
We see that is generates a sample of random actions with random arguments.
The next method to implement is initialState which, as the name suggests, is the initial state of our model.
initialState = TSModel Map.empty
Now comes the most complex function that we must implement to set this up. You will recall from when we looked at the diagram that we must know what effect performing and action will have on the model. This is exactly what the nextState function does.
If we look at the type of nextState, we see that it takes an action and returns something in yet another monad, this time the Spec monad. The Spec monad allows us to inspect the current state of our model, and also to transfer funds within our model.
nextState :: ContractModel state => Action state -> Spec state ()
Let’s look an example for Start. This should tell us the effect on our model if wallet w starts a token sale.
nextState (Start w) = do
  withdraw w $ nfts Map.! w
    (tsModel . at w) $= Just (TSState 0 0 0)
  wait 1
Here we see a function from the Spec monad called withdraw. Using withdraw means that some funds go from a wallet to a contract - it doesn’t matter which contract. So, this says that the effect of Start will be that Wallet w loses the NFT.
The NFT is again something that is defined in a helper function. Let’s quickly look at the helper functions that define the NFTs and tradable tokens.
Each wallet will trade its own token and each wallet will have its own NFT.
tokenCurrencies, nftCurrencies :: Map Wallet CurrencySymbol
tokenCurrencies = Map.fromList $ zip wallets ["aa", "bb"]
nftCurrencies   = Map.fromList $ zip wallets ["01", "02"]

tokenNames :: Map Wallet TokenName
tokenNames = Map.fromList $ zip wallets ["A", "B"]

tokens :: Map Wallet AssetClass
tokens = Map.fromList [(w, AssetClass (tokenCurrencies Map.! w, tokenNames Map.! w)) | w <- wallets]

nftAssets :: Map Wallet AssetClass
nftAssets = Map.fromList [(w, AssetClass (nftCurrencies Map.! w, nftName)) | w <- wallets]

nfts :: Map Wallet Value
nfts = Map.fromList [(w, assetClassValue (nftAssets Map.! w) 1) | w <- wallets]
Wallet 1 will trade the A token and Wallet 2 will trade the B token. Wallet one will have the 01 NFT and Wallet two will have the 02 NFT.
While we are here, we can look at the tss helper which exists alongside the above helper functions and maps the wallets to their TokenSale parameters.
tss :: Map Wallet TokenSale
tss = Map.fromList
    [ (w, TokenSale { tsSeller =  pubKeyHash $ walletPubKey w
                    , tsToken  =  tokens Map.! w
                    , tsNFT    =  nftAssets Map.! w
                    })
    | w <- wallets
    ]
Now, back to the nextState function. The first line of the do block says that the effect of calling Start will be that the wallet will loses the NFT to the contract. Remember that the NFT is locked in the contract when we start the token sale.
nextState (Start w) = do
  withdraw w $ nfts Map.! w
    (tsModel . at w) $= Just (TSState 0 0 0)
  wait 1
Secondly, there will be an effect on the model state. Remember that the model state is a map from Wallet to TSState, where TSState is a triple of price, tokens and Ada.
The second line of the do block says that after the contract has started, there will be an entry in the map at key w with 0 price, 0 tokens and 0 Ada.
The left hand side of the expression is another example of an optic, this time allowing us to access the map _tsModel from TSModel. The at lens allows us to reference a map entry at a given key. The type returned by this optic is a Maybe as the key may or may not be there.
The $= comes from the Spec monad and it takes a lens on the left-hand side and then a new value on the right-hand side.
The wait function comes from the Spec monad and says here that the Start will take one slot.
Now we do something similar for all the other operations. Firstly, SetPrice.
nextState (SetPrice v w p) = do
  when (v == w) $
      (tsModel . ix v . tssPrice) $= p
  wait 1
In this function, we only do something if the wallet that invokes SetPrice is the same as the wallet that is running the token sale. If it is then the funds don’t move, but we must update the model.
We use a different optic - instead of at we use ix which is a Traversal. It is similar to at, but whereas at returned a Maybe, ix does not. It also uses the tssPrice lens to access the first element of the TSState triple, which it sets to the price. In the event that ix does not find an entry, the line will have no effect.
Whether or not the wallets match, and whether or not the price update succeeds, we wait one slot.
The model state change for AddTokens is more complex.
nextState (AddTokens v w n) = do
  started <- hasStarted v                                     -- has the token sale started?
  ...
First we check the the token sale for wallet v has actually started, and this is yet another helper function.
getTSState' :: ModelState TSModel -> Wallet -> Maybe TSState
getTSState' s v = s ^. contractState . tsModel . at v
Given a ModelState (which is of type TSModel but with additional information such as current funds and current time) and given a Wallet, we want to extract the TSState which is the state of the token sale contract for that wallet, which may or may not have started yet.
This is again performed using optics. There is a lens called contractState which, here is the TSModel type. We then zoom into the map and use the at lens, which will return Nothing if the wallet key v does not exist, or a Just TSState if it is there.
Using this, we can write a slight variety of this function which doesn’t have the first argument. Instead it takes just the Wallet argument, but then returns the Maybe TSState in the Spec monad. In order to do that, we use a feature of the Spec monad, a function called getModelState, which will return the model state, which we then pass to the primed version of the function along with the Wallet argument.
getTSState :: Wallet -> Spec TSModel (Maybe TSState)
getTSState v = do
    s <- getModelState
    return $ getTSState' s v
And then another variation, this time called hasStarted, which will tells us, within the Spec monad, whether the token sale has stared or not.
hasStarted :: Wallet -> Spec TSModel Bool
hasStarted v = isJust <$> getTSState v
This just checks whether the return value from getTSState v is a Just or a Nothing. The isJust function returns True if it is a Just, and we need to use fmap to lift it into the Spec monad.
Continuing the nextState function for AddTokens
nextState (AddTokens v w n) = do
  started <- hasStarted v
  when (n > 0 && started) $ do
    bc <- askModelState $ view $ balanceChange w
If the token sale has not started, we don’t do anything because AddTokens shouldn’t have any effect in that case.
We also check that the number of tokens to be added is greater than zero. If not, again we do nothing. Otherwise, we continue.
We now see another function from the Spec monad called askModelState, which is similar to getModelState but it doesn’t return the complete model state but instead takes a function and applies it to the the model state. The function view comes from the lens library and is just another name for the ^. operator for viewing the result of zooming into a lens.
And there is a balanceChange w lens which is a lens to the balance change of wallet w. The balance change refers to how much the funds of the wallet have changed since the start of the simulation.
At this point we have the balance change bound to bc. The reason we are doing this is because we want to make sure that the wallet has enough funds to add the requested number of tokens, which we now do. First we look up the token.
let token = tokens Map.! v
Then we check whether the wallet has enough of them.
when (tokenAmt + assetClassValueOf bc token >= n) $ do  -- does the wallet have the tokens to give?
  withdraw w $ assetClassValue token n
  (tsModel . ix v . tssToken) $~ (+ n)
wait 1
The number in tokenAmt is the number of tokens the wallet had at the start, so by adding this to the balance change for the token, we get the number of tokens currently in the wallet.
If we have enough tokens, then we withdraw the correct number of tokens from the wallet, and we update the model to show that the tokens should now be in the contract. Note that instead of using $= to set the value, we use the $~ function which applies a function to a value.
Again, we wait one slot.
Next, we write a nextState function for BuyTokens.
nextState (BuyTokens v w n) = do
when (n > 0) $ do
    m <- getTSState v
    case m of
        Just t
            | t ^. tssToken >= n -> do
                let p = t ^. tssPrice
                    l = p * n
                withdraw w $ lovelaceValueOf l
                deposit w $ assetClassValue (tokens Map.! v) n
                (tsModel . ix v . tssLovelace) $~ (+ l)
                (tsModel . ix v . tssToken)    $~ (+ (- n))
        _ -> return ()
wait 1
First we check the the number of tokens we are attempting to buy is positive. If so, then we get the state of the token sale.
If the state is a Just then we know that the token sale has started.
m <- getTSState v
case m of
    Just t
If so, then we use optics to check that the number of tokens available in the contract is at least enough for us to buy what we are asking for.
t ^. tssToken >= n -> do
If we are still going, we then lookup the current price and calculate how much the requested number of tokens will cost.
let p = t ^. tssPrice
l = p * n
The effect should then be that our wallet loses that number of lovelace, and gains the tokens we buy. Here we see the deposit function for the first time. It is the opposite of the withdraw function.
withdraw w $ lovelaceValueOf l
deposit w $ assetClassValue (tokens Map.! v) n
Finally we update the model state by adding the lovelace and removing the bought tokens.
(tsModel . ix v . tssLovelace) $~ (+ l)
(tsModel . ix v . tssToken)    $~ (+ (- n))
And we wait for one slot.
Finally, the Withdraw action.
nextState (Withdraw v w n l) = do
when (v == w) $ do
    m <- getTSState v
    case m of
        Just t
            | t ^. tssToken >= n && t ^. tssLovelace >= l -> do
                deposit w $ lovelaceValueOf l <> assetClassValue (tokens Map.! w) n
                (tsModel . ix v . tssLovelace) $~ (+ (- l))
                (tsModel . ix v . tssToken) $~ (+ (- n))
        _ -> return ()
wait 1
This is only possible if the wallet wanting to withdraw is the same as the wallet running the sale. We check this first, then get the contract state.
We check both that there are enough tokens for us to withdraw the tokens that we are requesting, and also that there are enough lovelace for us to withdraw the lovelace that we are requesting. If this is satisfied, the effect is that we add the lovelace and the tokens to the wallet, and the model is updated to reflect the fact that the tokens and the lovelace have been removed.
That completes the nextState function declarations.
Right now, the model is just a conceptual model that has nothing to do with the contracts we wrote earlier. The names are suggestive because they have same names as we used in the redeemer, but there is no link yet between the model and the actual contracts.
The link is provided by yet another method in the ContractModel class that we have to implement, and that’s the perform function.
perform
  :: ContractModel state =>
    HandleFun state
    -> ModelState state
    -> Action state
    -> Plutus.Trace.Emulator.EmulatorTrace ()
It takes something called HandleFun and then it takes the ModelState and the Action.
The HandleFun parameter gives us access to the contract handles.
Let’s look at our implementation of this method. We don’t need access to the ModelState for this example.
perform h _ cmd = case cmd of
  (Start w)          -> callEndpoint @"start"      (h $ StartKey w) (nftCurrencies Map.! w, tokenCurrencies Map.! w, tokenNames Map.! w) >> delay 1
  (SetPrice v w p)   -> callEndpoint @"set price"  (h $ UseKey v w) p                                                                    >> delay 1
  (AddTokens v w n)  -> callEndpoint @"add tokens" (h $ UseKey v w) n                                                                    >> delay 1
  (BuyTokens v w n)  -> callEndpoint @"buy tokens" (h $ UseKey v w) n                                                                    >> delay 1
  (Withdraw v w n l) -> callEndpoint @"withdraw"   (h $ UseKey v w) (n, l)
Here we are linking actions to contract endpoints. Recall that we wrote functions that create keys that uniquely identify contracts. The functions were called StartKey and UseKey.
The StartKey function takes one Wallet as an argument, and you can see that we give that argument here in the first line of the body of the function. Then we apply the function h to it. The function h is the HandleFun parameter and it is the job of this function to get a handle to the contract instance associated with a given key.
We also pass in the parameters. So in the example of the start action, we pass in a pre-computed values for the NFT, the token currencies and the token names. We will say later how the instanceSpec function links the StartKey to startEndpoint’, the primed version of the function, which takes those three parameters.
The delay function used in perform is another simple helper function to wait for a number of slots.
delay :: Int -> EmulatorTrace ()
delay = void . waitNSlots . fromIntegral
All the other actions are very similar, but note that they all use UseKey instead of StartKey.
Finally, the last method we must provide for the ContractModel instance is precondition. This allows us to define the conditions under which it is acceptable to provide each action.
precondition :: ContractModel state => ModelState state -> Action state -> Bool
The precondition for Start is that the token sale has not yet started. It says that, given a certain state s and the Start w action, check that the return value of getTSState’ s w is Nothing.
precondition s (Start w) = isNothing $ getTSState' s w
And for the others, we do the opposite. They are only possible if the token sale has started.
precondition s (SetPrice v _ _)   = isJust    $ getTSState' s v
precondition s (AddTokens v _ _)  = isJust    $ getTSState' s v
precondition s (BuyTokens v _ _)  = isJust    $ getTSState' s v
precondition s (Withdraw v _ _ _) = isJust    $ getTSState' s v
One last thing, we must link the keys to actual contracts. We do this with the instanceSpec function.
instanceSpec :: [ContractInstanceSpec TSModel]
instanceSpec =
    [ContractInstanceSpec (StartKey w) w startEndpoint' | w <- wallets] ++
    [ContractInstanceSpec (UseKey v w) w $ useEndpoints $ tss Map.! v | v <- wallets, w <- wallets]
The instanceSpec function returns a list of ContractInstanceSpec types.
A ContractInstanceSpec takes three arguments - the first is the key, the second is the wallet, and the third is the contract that is supposed to be invoked.
For the start endpoint, we generate a ContractInstanceSpec for each wallet.
For the use endpoint, we generate a ContractInstanceSpec for all combinations of two wallets. Note also that the useEndpoints function takes an argument of type TokenSale, so we need to get this from Wallet v and pass it in.
And finally (honestly), we can define a QuickCheck property.
There’s a function in Plutus.Contract.Test called propRunActionsWithOptions.
propRunActionsWithOptions
:: ContractModel state =>
   Plutus.Contract.Test.CheckOptions
   -> [ContractInstanceSpec state]
   -> (ModelState state -> Plutus.Contract.Test.TracePredicate)
   -> Actions state
   -> Property
First it takes the CheckOptions type that we have seen before when we did emulator trace testing. Next it takes the list of ContractInstanceSpecs that we defined above. Then it takes a function from ModelState to TracePredicate, which allows us to insert additional tests. And finally, it produces a function from a list of Actions to Property. Property is like a beefed-up Bool, which has additional capabilities, mostly for logging and debugging.
We use this in the prop_TS function. For options we use the same as before which allows us to specify the initial coin distributions. We give each wallet 1,000 Ada, the wallet’s NFT and 1,000 of both tokens, A and B.
For the second argument we provide the instanceSpec function. For the third argument, we don’t add any additional checks.
prop_TS :: Actions TSModel -> Property
prop_TS = withMaxSuccess 100 . propRunActionsWithOptions
    (defaultCheckOptions & emulatorConfig .~ EmulatorConfig (Left d))
    instanceSpec
    (const $ pure True)
  where
    d :: InitialDistribution
    d = Map.fromList $ [ ( w
                         , lovelaceValueOf 1000_000_000 <>
                           (nfts Map.! w)               <>
                           mconcat [assetClassValue t tokenAmt | t <- Map.elems tokens])
                       | w <- wallets
                       ]
This results in a type
Actions TSModel -> Property
And this is something that QuickCheck can handle.
Let’s look at a sample of Actions TSModel
Prelude Test.QuickCheck Plutus.Contract.Test.ContractModel Spec.Model> sample (arbitrary :: Gen (Actions TSModel))
Actions []
Actions []
Actions []
Actions []
Actions []
Actions
 [Start (Wallet 1),
  AddTokens (Wallet 1) (Wallet 2) 8,
  Withdraw (Wallet 1) (Wallet 2) 5 1,
  Withdraw (Wallet 1) (Wallet 1) 7 2,
  SetPrice (Wallet 1) (Wallet 1) 0,
  Start (Wallet 2),
  BuyTokens (Wallet 2) (Wallet 1) 2]
Actions
 [Start (Wallet 1)]
Actions
 [Start (Wallet 2),
  Withdraw (Wallet 2) (Wallet 1) 4 5,
  SetPrice (Wallet 2) (Wallet 2) 5,
  BuyTokens (Wallet 2) (Wallet 2) 3,
  Start (Wallet 1),
  BuyTokens (Wallet 1) (Wallet 1) 14,
  Withdraw (Wallet 1) (Wallet 1) 11 7,
  AddTokens (Wallet 2) (Wallet 1) 12]
Actions
 [Start (Wallet 1),
  AddTokens (Wallet 1) (Wallet 2) 1,
  BuyTokens (Wallet 1) (Wallet 1) 11,
  SetPrice (Wallet 1) (Wallet 2) 5,
  Withdraw (Wallet 1) (Wallet 1) 10 6,
  Withdraw (Wallet 1) (Wallet 2) 13 0,
  BuyTokens (Wallet 1) (Wallet 1) 8,
  Withdraw (Wallet 1) (Wallet 2) 6 14,
  SetPrice (Wallet 1) (Wallet 2) 7,
  BuyTokens (Wallet 1) (Wallet 2) 4,
  AddTokens (Wallet 1) (Wallet 2) 3]
Actions
 [Start (Wallet 1),
  BuyTokens (Wallet 1) (Wallet 2) 10]
Actions
 [Start (Wallet 1),
  SetPrice (Wallet 1) (Wallet 2) 14,
  BuyTokens (Wallet 1) (Wallet 1) 20,
  BuyTokens (Wallet 1) (Wallet 2) 15,
  Start (Wallet 2),
  Withdraw (Wallet 2) (Wallet 2) 14 1,
  AddTokens (Wallet 2) (Wallet 2) 4,
  Withdraw (Wallet 2) (Wallet 1) 21 2,
  SetPrice (Wallet 2) (Wallet 1) 8,
  Withdraw (Wallet 1) (Wallet 2) 15 17,
  SetPrice (Wallet 1) (Wallet 1) 2,
  BuyTokens (Wallet 2) (Wallet 1) 4]
We notice here a similar pattern to before, where things start quite simply and get more complex as the list goes on.
So what will be tested? As we saw in the diagram back at the beginning, for all these randomly-generated action sequences, it will test that the properties we specified in the model - how the funds flow - corresponds to what actually happens in the emulator. If there is a discrepancy, the test will fail.
Let’s use it!
Prelude Test.QuickCheck Plutus.Contract.Test.ContractModel Spec.Model> test
(21 tests)
It takes quite a while.
Prelude Test.QuickCheck Plutus.Contract.Test.ContractModel Spec.Model> test
(27 tests)
But it will run 100 if you let it complete.
What might be more interesting would be to implement a bug in the code and see if these tests will find it.
In the transition function of our TokenSale code, let’s forget to check that only the seller can change the price.
transition :: TokenSale -> State Integer -> TSRedeemer -> Maybe (TxConstraints Void Void, State Integer)
transition ts s r = case (stateValue s, stateData s, r) of
    (v, _, SetPrice p)   | p >= 0 -> Just ( mempty -- Just ( Constraints.mustBeSignedBy (tsSeller ts)
    , State p $
      v <>
      nft (negate 1)
    )
...
We need to reload the code.
Prelude Test.QuickCheck Plutus.Contract.Test.ContractModel Spec.Model> :l test/Spec/Model.hs
Ok, one module loaded.
Prelude Test.QuickCheck Plutus.Contract.Test.ContractModel Spec.Model> test
*** Failed! Assertion failed (after 13 tests and 2 shrinks)...
You will see a whole bunch of output, but at the top, you will see clearly the action sequence that led to the bug.
Actions
  [Start (Wallet 2),
   SetPrice (Wallet 2) (Wallet 1) 12,
   AddTokens (Wallet 2) (Wallet 2) 11,
   BuyTokens (Wallet 2) (Wallet 2) 1]
Expected funds of W2 to change by
   Value (Map [(02,Map [("NFT",-1)]),(bb,Map [("B",-10)])])
   (excluding 29466 lovelace in fees)
but they changed to
   Value (Map [(,Map [("",-12)]),(02,Map [("NFT",-1)]),(bb,Map [("B",-10)])])
Test failed.
And we see that Wallet 1 has tried to set the price of the token sale that was started by Wallet 2. This should result in no change, because Wallet 1 is not allowed to do this.
The model believes that the price should still be zero, but in the emulator the price has been set to 12.
Then Wallet 2 adds 11 tokens, and then buys 1 token from itself.
According to the model, the tokens should be free. The model expects that the wallet loses the NFT, that the wallet also loses 10 “B” because it gave 11 and then bought 1 back, and that there is no change in Ada in the wallet, because the token price is zero.
But in the emulator, setting the price did have an effect, and so it reports that the wallet lost 12 lovelace.
So the discrepancy in the flow of funds has been found, and QuickCheck reports the error.
By default this is all the QuickCheck test do. It only checks the flow of funds, whether the emulator and the model agree at each point. It is, however, possible to add additional checks. And it is also possible to influence the action sequences so that we can specify certain flows of actions to steer the tests in certain directions. That is called Dynamic Logic, and that is yet another monad.
Even though this is very powerful, it also has its limitations. For one, it only tests the contracts that we provide. It doesn’t test all possible off-chain code. It is possible that some party could write their own off-chain code that would allow them to steal funds from our contract, and this QuickCheck model can’t test for that.
The second problem is concurrency. We added this delay of one slot to each action to make sure that everything is nicely sequenced. Of course, in a real blockchain or in an emulator, wallets can have concurrent submissions of transactions. In principle we could try to do that with this model as well, but then we would need to somehow specify in the model what should happen in each case and that could get very complicated.
We should quickly look at how this integrates with Tasty.
There is a function in the Tasty library called testProperty that takes, as one its arguments, a QuickCheck property.
tests :: TestTree
tests = testProperty "token sale model" prop_TS
You will see an additional stanza in this week’s cabal file
test-suite plutus-pioneer-program-week08-tests
type: exitcode-stdio-1.0
main-is: Spec.hs
...
And, if we look at the referenced Spec.hs
main :: IO ()
main = defaultMain tests

tests :: TestTree
tests = testGroup "token sale"
    [ Spec.Trace.tests
    , Spec.Model.tests
    ]
We can see that it specifies a list of test modules. And these can be run from the command line with the following command.
cabal test